Tutorial 4: Source Control (Git/Github) with Visual Studio Code (VSCode)
Tip
Click on the boxes throughout this tutorial labeled “More Detail (click here to show/hide)” in order to see more detailed information and/or helpful hints. Click again to hide the info again.
More Detail (click here to show/hide)
The instructions below make use of the menus to run commands, but you could alternatively run the commands using keyboard shortcuts, or by pulling up the Command Palette (Command+Shift+P on Mac, or Ctrl+Shift+P on Windows or Linux) and simply typing the command (e.g. Command+Shift+P then type “connect to host”).
Tip
Click any picture to enlarge it. (Then use your browser’s ‘Back’ button to return to the tutorial).
You will learn to …
Set up source control (a.k.a. version control) from scratch in VSCode (with Git)
Record your code versions/history using ‘commits’.
Switch between multiple versions of your code using branches
Incorporate new changes to your code by merging branches
Publish your code / source control to GigHub for collaboration
In Git terminology (for those familiar), you will learn how to do the following Git actions in VSCode: init, stage, commit, branch, checkout, push
Prerequisites
You need to have Git installed. You can download Git here or follow the directions in the Source Control sidebar in VSCode.
The Scenario
You set up source control to keep track of the current stable version of your code. Then you start working on a new feature, but are interrupted by someone who wants you to run a calculation using the original version of your code. You switch to that code version to fulfill the request and the switch back to pick up where you left off developing your new feature. Once you are happy with this new feature, you incorporate it into your main (‘stable’) version of your code. Then you publish your code (and history) to GitHub to collaborate with others.
Setting up Source Control (with Git)
Follow the directions outlined here to open a session connecting Visual Studio Code on your laptop (or desktop) to subMIT. (But do not open a folder yet once connected to subMIT).
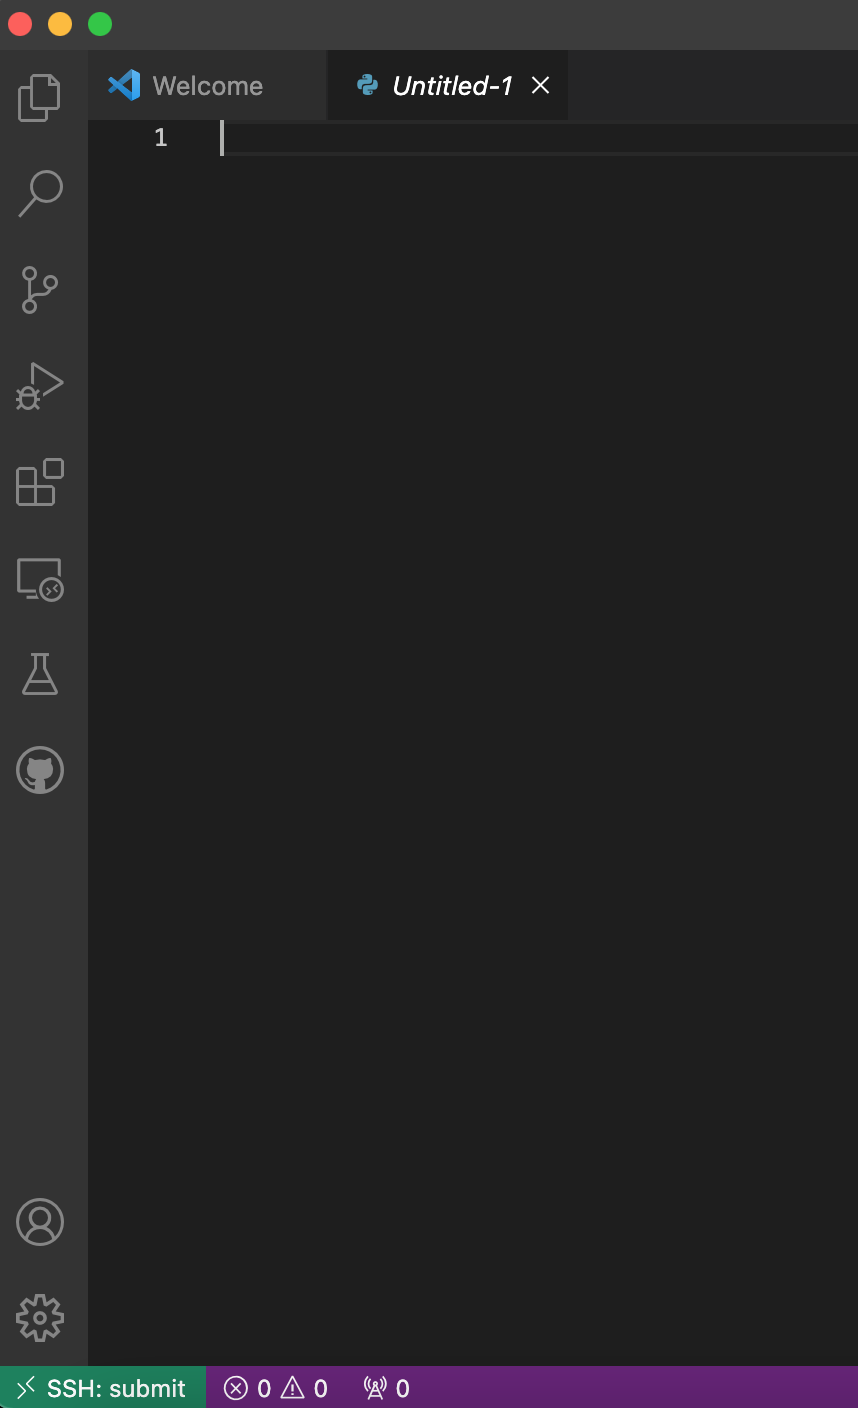
From the top menu, select “File” -> “New Text File …”
A new python-editor tab titled “Untitled-1” will appear (it may take a moment).
Copy & paste the following code into that editor window.
1x = [1.0,2.0,3.0,4.0,5.0,6.0,7.0,8.0,9.0,10.0]
2y = []
3
4for xval in x:
5    y.append(xval**2)
6
7print("The values squared from for loop are:{}".format(y))
More Detail (click here to show/hide)
Click and drag in your browser to highlight the code above, then right-click and select “Copy”.
Click in the “Untitled-1” editor tab in VSCode. (You should see a vertical text cursor bar blinking next to the number “1”, indicating that the focus is set to line number 1).
From the menu, select “Edit” -> “Paste”. The code should now appear within your “Untitled-1” editor tab within VSCode.
From the menu, select “File” -> “Save”.
A drop-down menu will appear at the top of your screen suggesting a filename in your home directory on submit. It will look something like: /home/submit/username/x = [1.py, where “username” is your subMIT (kerberos) username.
Change this to “/home/submit/username/tutorial_vscode_source/small_script.py”, but replace “username” with your subMIT (kerberos) username. Then hit OK.

VSCode will now prompt you, “The folder tutorial_vscode_source does not exist. Would you like to create it?”. Hit the “OK” button.
More Detail (click here to show/hide)
This is because we included a directory that does not exist yet in the path we just entered, at the top of the screen.
This created a directory (folder) and a file in your subMIT home directory (on the subMIT servers).
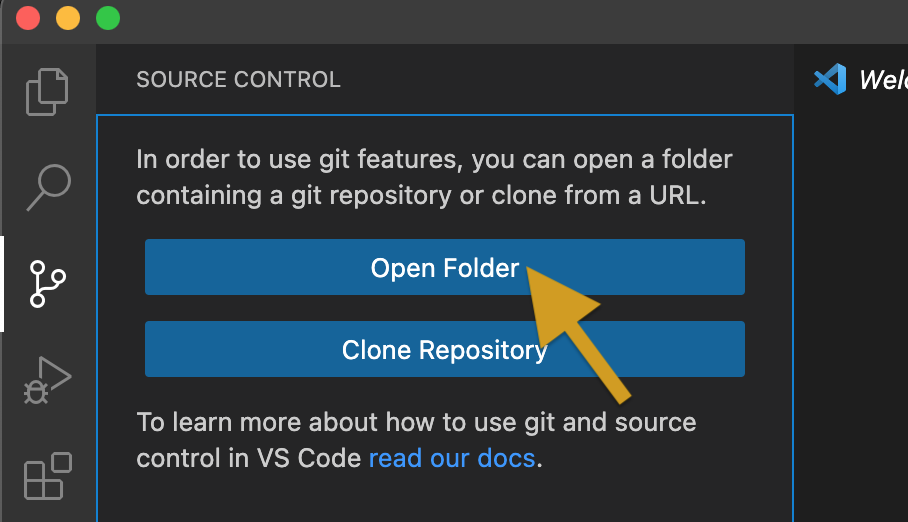
Open the Source Control sidebar by clicking the “Source Control” icon or via the top menu: “View”->”Source Control”.

Click the “Open Folder” button in the Source Control sidebar.
More Detail (click here to show/hide)
We choose this option since we are making a repository from scratch in this example.
In the bar that appears on the top of your screen, type in “/home/submit/username/tutorial_vscode_source” but change “username” to your subMIT (kerberos) username to select the folder we just created that contains our code. Then click “Ok” or hit “Enter”.
Note
This will re-establish your connection to subMIT so may take a moment.
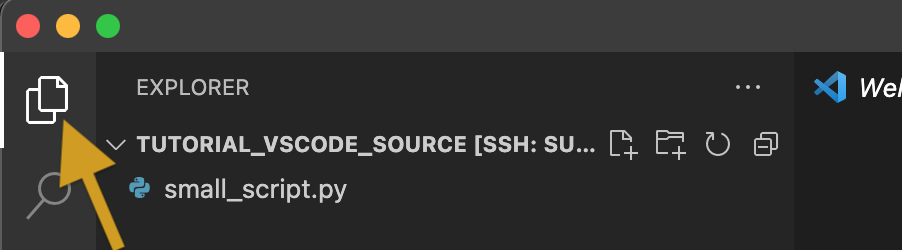
Now if you click on the File Explorer icon on the left, you will see our file “small_script.py” listed under this tutorial folder. (Remember, this file is on the subMIT servers).
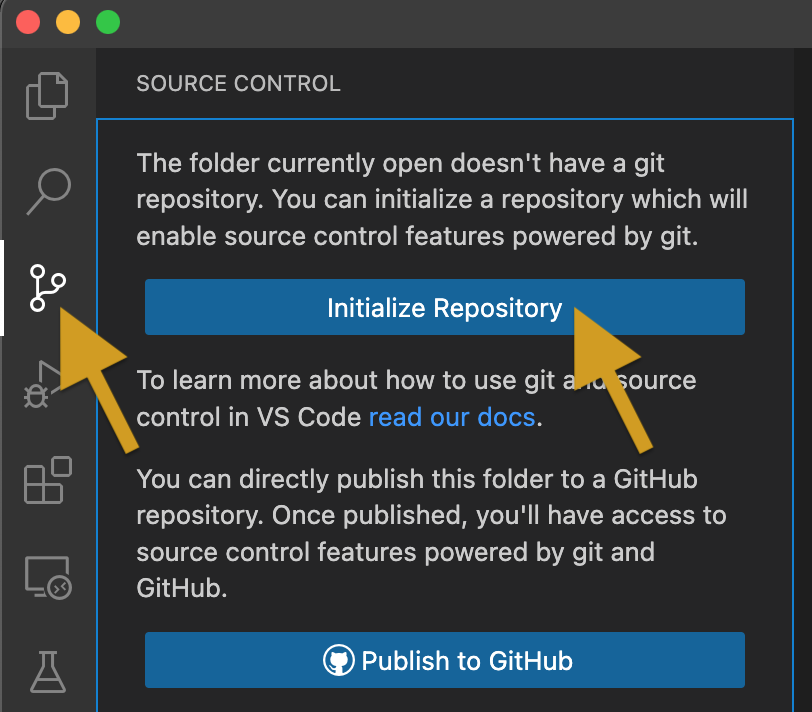
In the “Source Control” sidebar (“View”->”Source Control”), click the “Initialize Repository” button.
Note
At the bottom left of your VSCode window, you can see that you are now on the “main” branch.

The Source Control icon now has a blue circle with a “1” in it to indicate that 1 file has changes that are not in the repository.
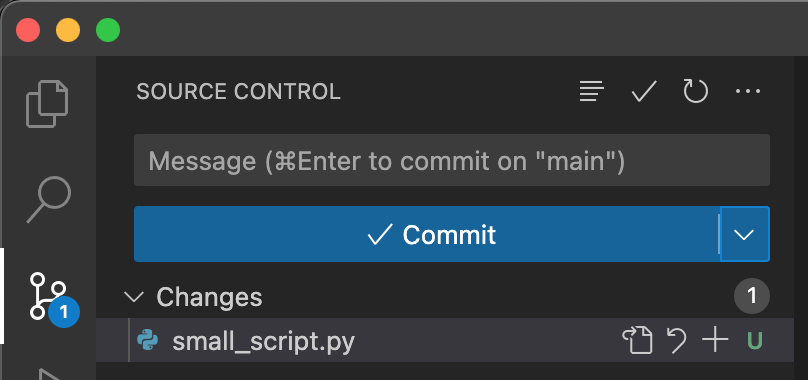
In the Source Control sidebar window, our file “small_script.py” appears under the “Changes” tree item to indicate that this file has changes which are not in the repository.
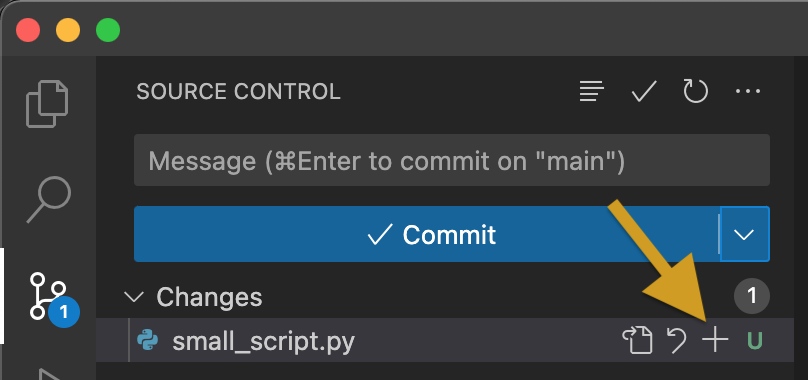
In the Source Control sidebar, click the “Stage Changes” icon (the “+”) for “small_script.py”
Note
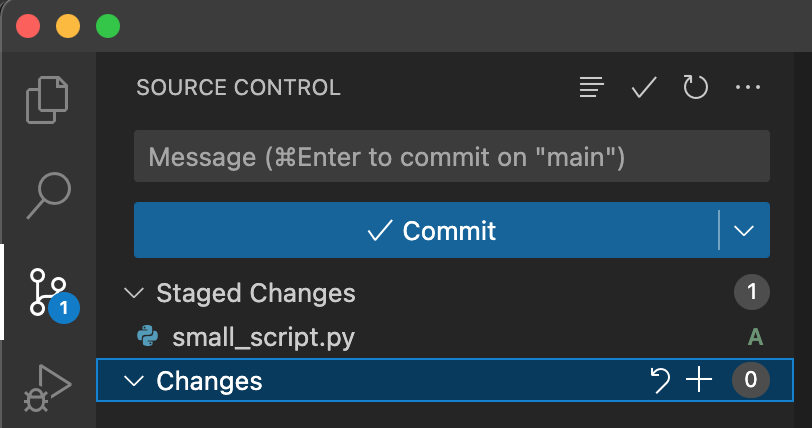
Now “small_script.py” is listed under “Staged Changes”
More Detail (click here to show/hide)
VSCode has a “Smart Commit” feature which can eliminate this step of staging changes.
To enable it, select the menu item “Code” -> “Preferences” -> “Settings” and then search for (and enable) “Git: Enable Smart Commit”. Also look at and configure the setting “Git: Smart Commit Changes”, which defines the behavior of this feature.
Click in the “Message” box above the “Commit” button and type “First working version”, then click the “Commit” button.
You now have version control set up to track changes to our code in “small_script.py”!
More Detail (click here to show/hide)
Note
The source control is performed by the program Git. With this setup, Git and your code both run on the subMIT machines.
Tip
At this point, you could click the “Publish this Branch” button in order to put this code into a GitHub repository (repo) as well. In this tutorial, we will wait until later to do this in order to illustrate that Git and GitHub are separate entities.
Simulating Code Editing (Adding a new feature)
Now let’s simulate creating a new experimental feature.
First we create a new branch so we can work on this new feature while maintaining a perfect copy of our working code.
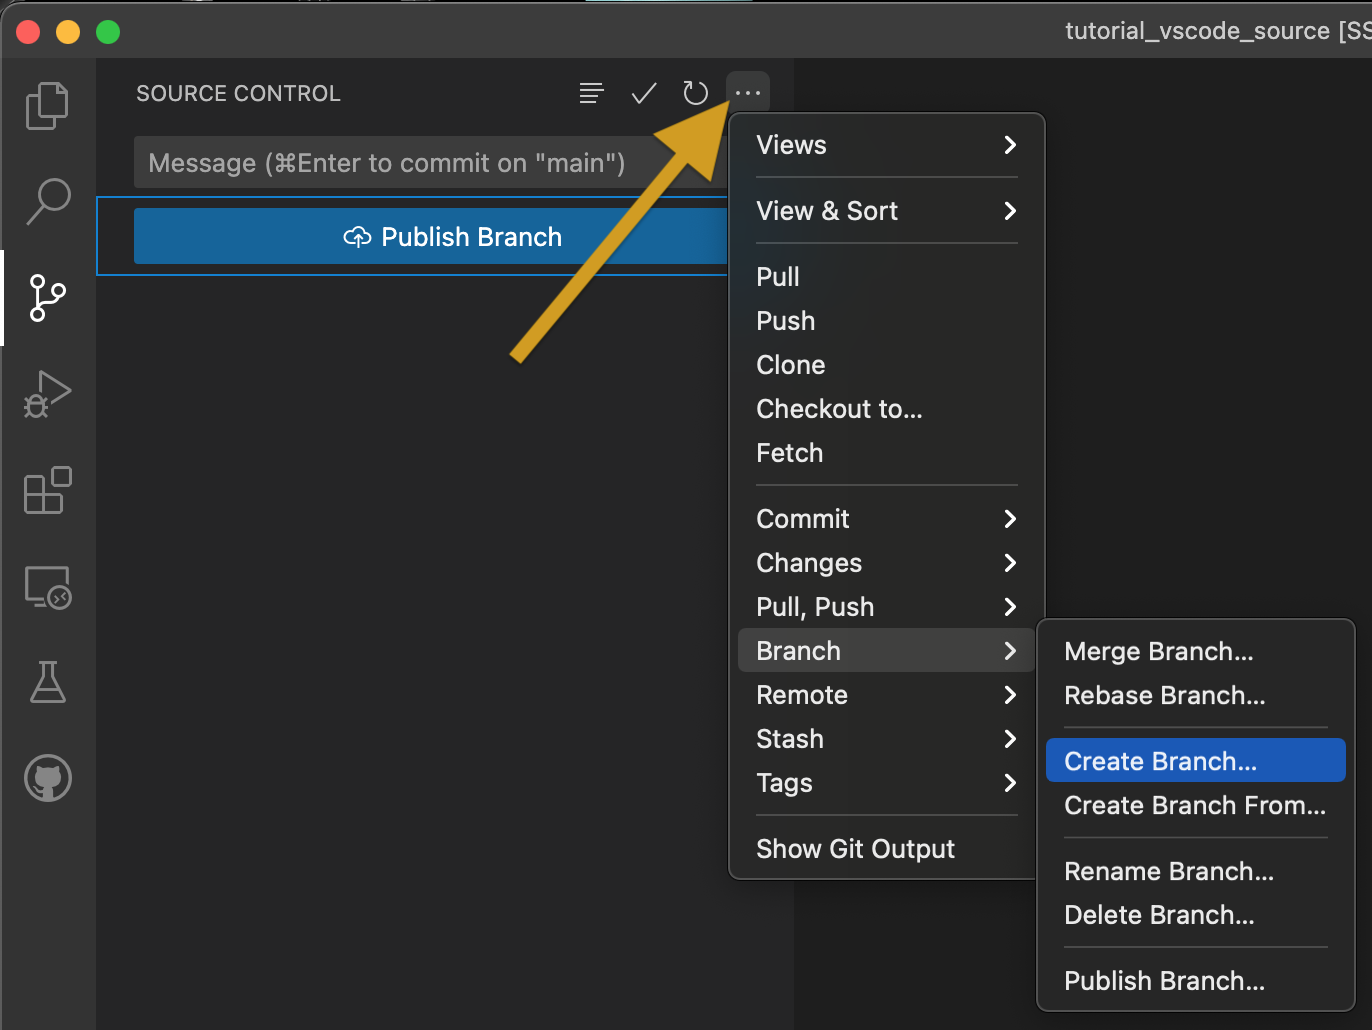
Click on the current branch (“main”) on the bottom of the window, and then select “+ Create new branch …” from the dropdown that appears at the top of the screen.
More Detail (click here to show/hide)
Alternatively, in the Source Control sidebar, you could click the “…” next to “Source Control”, then select “Branch” -> “Create Branch …”.
Yet another alternative is to click the “…” next to “Source Control”, then select “Checkout to …” and then select “+ Create new branch …” from the dropdown that appears.
Type “cubed” in the text box and then Enter (Return).
Note
The bottom of the window now indicates that we are on the branch “cubed”

Click on the Explorer icon and then “small_script.py” to bring up the editor with our file.

Let’s add computing the cube of the number as well. Make the following changes to the code:
add “
; z = []” to the end of line 2put your cursor at the end of line 5, then hit Enter, then type “
z.append(xval**3)”
Your code should now look like this:
1x = [1.0,2.0,3.0,4.0,5.0,6.0,7.0,8.0,9.0,10.0]
2y = []; z = []
3
4for xval in x:
5    y.append(xval**2)
6    z.append(xval**3)
7
8print("The values squared from for loop are:{}".format(y))
Then “File” -> “Save”.
Hint
Instead of manually making the above changes, you can simply delete all the code in the editor, then copy & paste the entire above code block into the editor, then save.
More Detail (click here to show/hide)
If you copy & paste, it will not fool the version control. Instead, VSCode (via Git) will still only flag the actual meaningful changes in the code, rather than every line, even though you “rewrote” every line by pasting. This is because Git does a
diffcomparison. Try it.Note that the source control icon once again has a blue “1”, indicating a pending change.
The blue mark next to line 2 and green by line 6 indicate that those lines have been changed/added, respectively.
A deletion will show up as a red arrow to the left of the line.
If you click on those blue/green/red marks, VSCode will show the changes!
Now commit this change to record it with source control: as before,
go to the Source Control sidebar (“View”->”Source Control”)
click the “+” to stage the changes
type “calculates cube” in the Message box above the Commit button
click the Commit button
More Detail (click here to show/hide)
If you had forgotten to stage your changes and tried to commit an empty commit (no changes), then VSCode would have warned you and asked if you simply want to stage all changes for the commit.
Simulating Switching Back to Your Main (Stable) Version of the Code
We’re still in the middle of adding this new feature, but let’s pretend you need to switch back to your main (stable) version of the code right now. Perhaps someone urgently needs to know what 3 squared is, so you need to immediately switch back to your working version of the code!
Recall that we have the current stable version of your code on the “main” branch.
To switch to the “main” branch, simply click on the current branch (“cubed”) at the bottom of the window.
And then select “main” from the drop-down that appears at the top of your screen.
Note
Now the bottom of your window should indicate that you are back on the main branch:
And the code in the editor should reflect the ‘old’ version of your code which just squares numbers.
Now you can run your code if you want from the menu: “Run” -> “Run Without Debugging” (or hitting the ‘Play’ button at the upper right of your editor) … or just pretend that you did.
You now switched back to the stable version of your code in the middle of working on a new feature!
Finish & Incorporate your new changes
Ok, so that fire has been put out. Let’s get back to our new feature…
The version of the code where we are adding the ‘cubing functionality’ is on the “cubed” branch.
To switch to the “cubed” branch, simply click on “main” (the current branch) in the lower bar of your screen
Then click on “cubed” from the drop-down menu which appears at the top of your screen.
Note
The lower bar of your screen should indicate that you are on the “cubed” branch and the editor should reflect our new code which also cubes numbers.
To finish our work, we still need to print out our new results. To do that, place your cursor (click) at the end of line 8, hit Enter, then type (or paste) “
print("The values cubed from for loop are:{}".format(z))”Your code should now look like this:
1x = [1.0,2.0,3.0,4.0,5.0,6.0,7.0,8.0,9.0,10.0]
2y = []; z = []
3
4for xval in x:
5    y.append(xval**2)
6    z.append(xval**3)
7
8print("The values squared from for loop are:{}".format(y))
9print("The values cubed from for loop are:{}".format(z))
Then hit “File”->”Save”
Now commit this change to record it with source control: as before,
go to the Source Control sidebar (“View”->”Source Control”)
click the “+” to stage the changes
type “prints cube” in the Message box above the Commit button
click the Commit button
Merging your changes into the main branch
Now lets say you have meticulously checked your new code and you are ready to incorporate these changes into your main (stable) version of the code.
To do this, go back to the ‘main’ branch of your code as before:
click “cubed” (the current branch) at the bottom of the screen
click “main” (the branch you want) from the drop-down that appears at the top of the screen
check that the bottom of the screen now says “main” and your code reflects your ‘old’ code
On the Source Control sidebar, click the “…” then “Branch” -> “Merge Branch …”
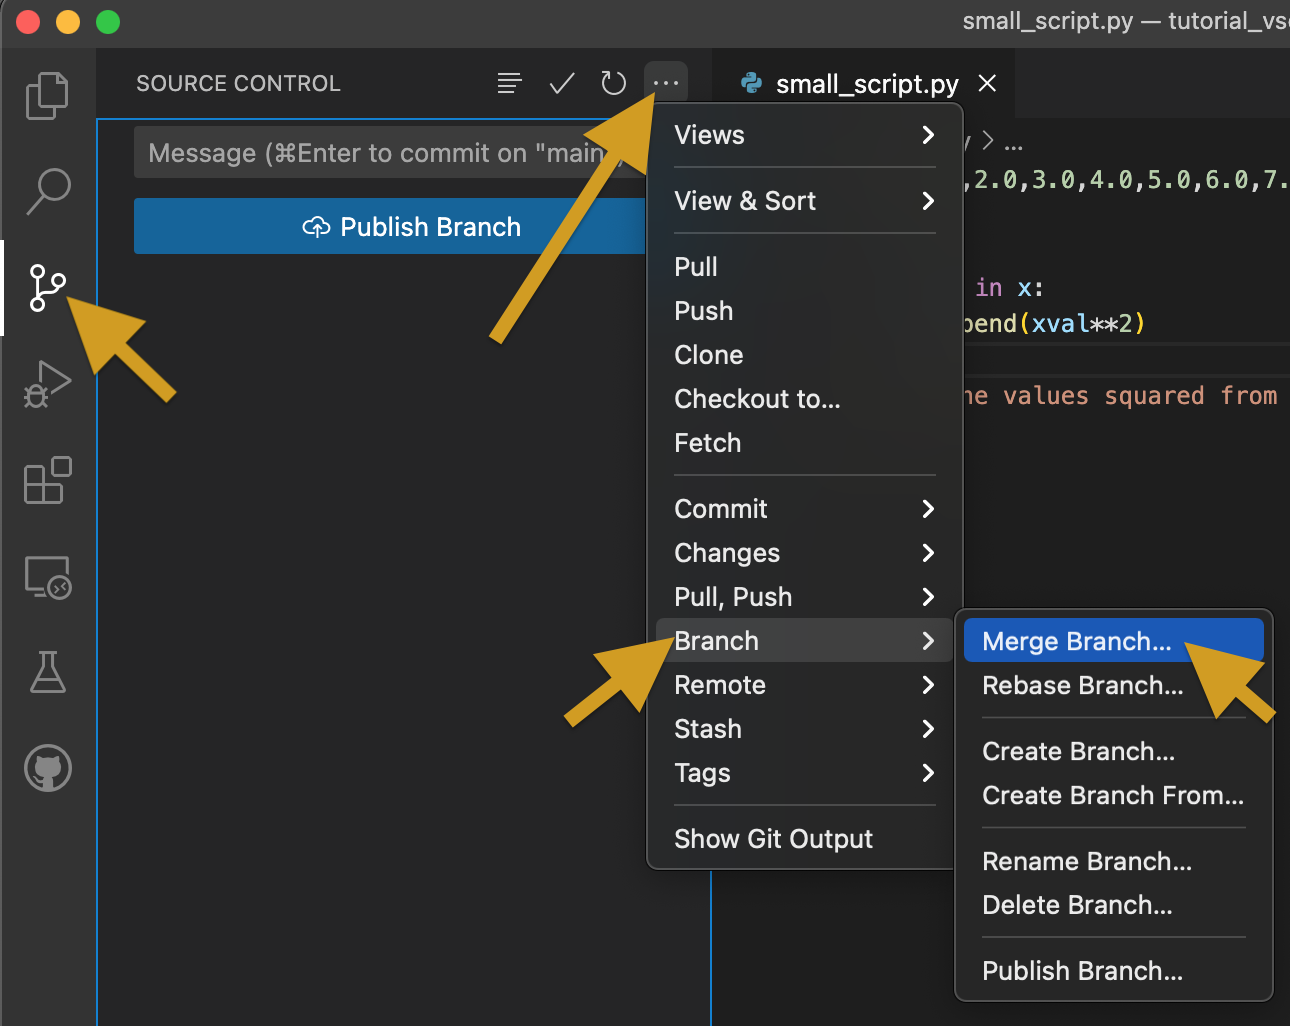
Select “cubed” from the drop-down which appears at the top of your screen.
Now your code contains your new cubed code and you are still on the main branch.
You have successfully merged these changes to the main branch!
More Detail (click here to show/hide)
If you want to view the history of your code, one way is to view the “Timeline” portion of the “Explorer” sidebar (“View”->”Explorer”). By default, this contains both changes recorded in source control (“Git History”) and other intermediate file saves (“Local History”). You can filter (funnel icon) the Timeline window to only show “Git history”. Then you can see that our main branch has acquired the history of our “cubed” branch.
Alternatively, you can always pull up a terminal within VSCode (menu “Terminal” -> “New Terminal”) and run ordinary git commands such as git log.
Publishing this to GitHub (remote repository)
What we have done so far has used git (behind the scenes within VSCode) and not GitHub. GitHub is a web service which hosts the source control for your code and provides functionality to facilitate code sharing/collaboration.
Let’s say now that you want to collaborate with others using GitHub, so you want to publish this to a GitHub repository.
Note
The standard terms ‘remote’ and ‘local’ can be confusing in this use case, since everything we have done so far was actually done on ‘remote’ machines (the subMIT servers). None of the code actually lives or is tracked on your laptop (what we would typically call your ‘local’ machine).
However, for the purposes of Github:
‘local’ means the repository located on subMIT. (This is what we have been using so far.)
‘remote’ means a repository hosted on GitHub.
In the Source Control sidebar, click “Publish Branch”.
A pop-up window will notify you that the ‘GitHub’ extension want to sign into GitHub. Click Allow.
Then you will be guided through an authentication process with GitHub.
Once that is finished, a drop-down menu will appear at the top of your screen asking whether to make it a public or private repository.
For this tutorial, choose (click) a public repository.
Now you should be able to see this repo on your GitHub page!
More Detail (click here to show/hide)
When connected to a GitHub repo like this, after each commit, the Commit button will turn into a “Sync Changes” button to allow you to easily synchronize your changes with the GitHub repository.
More Resources
VSCode Source Control page (has videos)
tools to help merge conflicts in VSCode (see also this video)
More source control Extensions